Step 1: Creating the rate file
The lane file template on the Rateview Multi-Lane page can be used to create a Multi-Lane request file.

Downloading this template will give you an example of what the spreadsheet will look like and in what order the columns will need to be. The header line of the template displays information to help with this.
You may also create your own spreadsheet to upload by completing the following steps:
- Open Microsoft Excel to a new worksheet
- Starting at the top of Column A, type in the Origin City
- In Column B, type in the Origin State
- In Column C, type in the Origin Postal Code
- In Column D, type in the Destination City
- In Column E, type in the Destination State
- In Column F, type in the Destination Postal Code
- In Column G, type in the Truck Type (optional field)
- In Column H, type in the ID/Reference number (optional field)
Note: The data must be in the following field order: Origin City, State, Postal Code, Destination City, State, Postal Code, Truck Type, ID (Both Broker Spot and Shipper Contract Multi-Lane Requests accepts 3 Digit, 5 Digit and 9 Digit postal codes)
Continue this pattern until all lanes are added and save the file as a csv (comma separated values) file.
Once the file is populated with lanes and saved, you are now ready to upload it.
Step 2: Uploading the rate file
From the Multi-Lane page, click the Select File button or drag-and-drop you file to the box provided.

The preview screen will now display and show you any errors that your file may contain.
If your file contains any errors, you can download the error file. It will have a new column showing the errors. Correct these errors in your original upload file and then submit it again.

Step 3: Fixing errors in your Upload File
To fix errors directly from your spreadsheet, click the Download button to download a copy of your spreadsheet with an indicator on rows that contain incorrect information.
Once downloaded, locate the file and open it. It will be in your Download folder unless you specified another location. The file will display a new column for "Errors" and describe what needs to be fixed.

Make the necessary corrections and save the file when finished. You may now return to the Multi-Lane tab and submit the edited file and it will process without error.
Step 4: Selecting your rates option
You will now need to define what you want returned on your request.

Note: Always take note of the Available Lane Credits left (displayed at the bottom-right of the screen), as going over your limit will incur additional charges.
Set Equipment Type:
If Truck types are included in your file, you can choose to use those by selecting Yes or override them by selecting No and choosing one of the equipment codes from the drop down list.
Describe your request:
Click in the field to name your file or accept the original name of the file that is pre-populated.
Choose Broker Spot Rates
Current rates for:
- Select the geography and timeframe for all lanes in the report. Using the same areas and timeframe makes it easier to compare results run at different times.
- 3 Digit Zip – DAT defined set of 3 digit ZIP codes for a City
- Market - DAT defined set of 3 digit ZIP codes or 2 digit Canada Postal Codes for a Market area
- X-Market - DAT defined aggregation of adjoining Market Areas and 3 digit ZIP codes or 2 digit Canada Postal Codes for an Expanded Market area
- Timeframe –specifies how far back we go in order to calculate the average rate. It can be specified as 7, 15, 30, 60, 90 days or 1 Year.
- auto-expand - When enabled, this option will automatically expand the search to the next best area and timeframe if no rates are available for a given selection.
- Current backhaul rates (at best match of area and timeframe) –This option provides backhaul rates for all lanes in your report.
- 13 Month History – This option provides the last 13 months of rates for all lanes in your report.
Choose Shipper Contract Rates
Select the geography and timeframe for all lanes in the report. Using the same areas and timeframe makes it easier to compare results run at different times.
- A Specific Area And Timeframe: This option allows you to
- Area: 3 Digit Zip – DAT defined set of 3 digit ZIP codes for a City
- Area: Market - DAT defined set of 3 digit ZIP codes or 2 digit Canada Postal Codes for a Market area
- Area: X-Market - DAT defined aggregation of adjoining Market Areas and 3 digit ZIP codes or 2 digit Canada Postal Codes for an Expanded Market area
- Timeframe – specifies how far back we go in order to calculate the average rate. It can be specified as 7, 15, 30, 60, 90 days or 1 Year.
- auto-expand - When enabled, this option will automatically expand the search to the next best area and timeframe if no rates are available for a given selection.
- 13 Month History – This option provides the last 13 months of rates for all lanes in your report.
Total estimated lane credits used:
Displays the number of lanes that will be deducted from your monthly Lane Credit balance. If you request a 13 month historic rate, you will be charged for each lane multiplied by the number of months for which we have data.
Tip: Always look at your balance before submitting a request to ensure that you do not exceed your monthly limit and incur additional charges.
When finished making your selections, click the SUBMIT REQUEST button to process your file.
Step 5: The results page
The request will show on the results page.

Click on the Download button to download the results file.
Click on the 3 dots next to the rate file to manage the results.
Re-submit
This button can be used to reprocess your file with the same parameters. If there is no new data, you will be notified with a message on the screen.
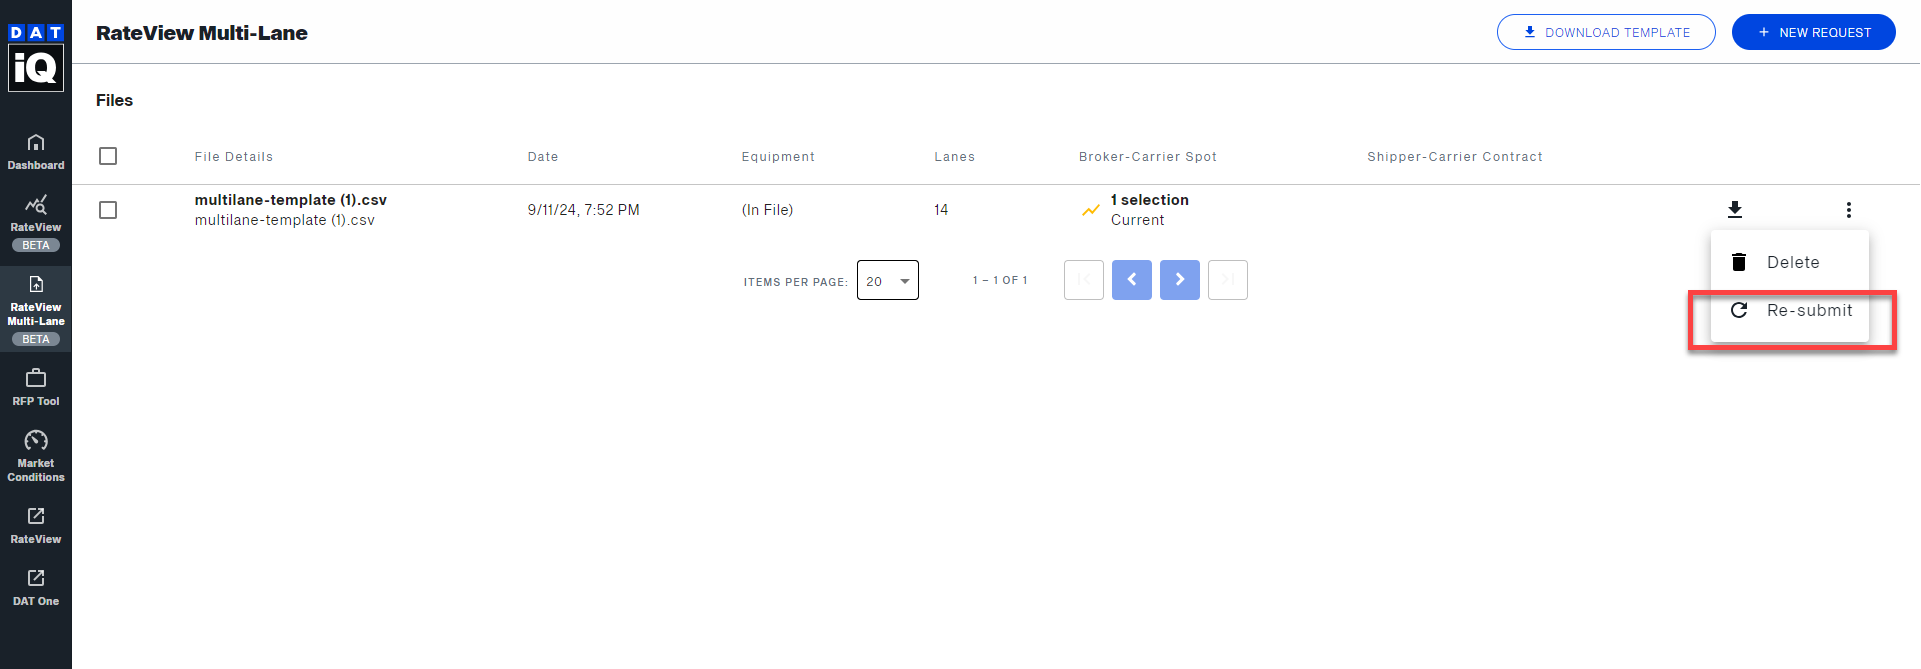
Delete
This option will delete either the file that was submitted or delete the whole request depending on which icon you select

Note: Processing can take several minutes depending on the size of the file. Result files are automatically removed after 90 days. You can submit up to 60,000 lanes at one time.
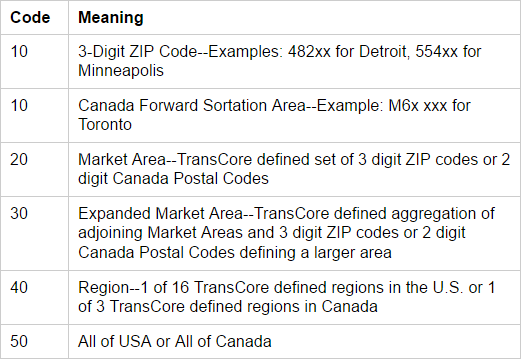
Refer to the table below in order to interpret the Origin Geo Expansion and Destination Geo Expansion Codes: